MariaMole——一个高级 Arduino IDE
MariaMole是一个用于Arduino开发的开源高级IDE,拥有像项目管理,可调整的编译器选和语法高亮显示等特性。
网址:http://dalpix.com/mariamole
MariaMole is an alternative software for creating Arduino programns. Some of its features are:
- User interface similar to other software development environments
- Works with multiple projects at the same time
- Code coloring themes
- Full control of the building process: It still handles it for you, but you can fine-tune it.
Want to know more? Check the following pages:
- Download MariaMole here(此为下载地址)
- Want a tutorial for your first steps? Check it here
- Have questions? Stuck on a problem? Check our FAQ here
- Want to see the release history? It’s available at the download page
- How can I help to improve MariaMole?
上面提供了下载地址,文件总共1.57M,很小。
安装好后运行,弹出如下图界面,选择Arduino.exe的安装路径,比如我的是“D:\Program Files\Arduino\arduino-1.0.5\”,然后就可以使用了。里面附带一个简单的教程。

运行后的主界面:

60秒快速使用说明:
MariaMole quick start: Learn its basics in 60 seconds! Check this tutorial for your first steps on MariaMole: http://dalpix.com/mariamole-tutorial
学习Arduino:去掉Arduino UNO板,直接使用ATmega328驱动LED灯闪烁
Arduino UNO 开发板是基于 ATmega328 的单片机。(点我查看官方说明)
那么我们能否直接使用 ATmega 来驱动 LED 灯闪烁呢?也就是直接做到 Blink 例子中的效果,即灯亮一秒、灭一秒。答案是可以的。
怎么做呢?
首先把 Arduino 与 PC 接好,然后把 Blink 程序下载到 Arduino 中,程序已经烧录进去。我们知道,该例子是让 Arduino 的 D13 号进行高低电平的切换,从而让接到该引脚的 LED 灯闪烁。
知道了这个,接下来我们把 ATmega328 芯片从 Arduino 上拿下,插在面包板上,一会要用。(记得插到中缝处跨过两边,这样才有针脚啊。)
那么下来该接线了,包括电源线和 LED 灯线。接到哪里呢?
我们先看看ATmega328的引脚标注:

上面的图来自于这个文件:AVR ATmega365p 技术手册,点我在线阅读。
我们查看这个文件(Arduino 官方给出的 Arduino UNO 板的电路图):http://arduino.cc/en/uploads/Main/Arduino_Uno_Rev3-schematic.pdf,在其中找到D13接到了 ATmega328 的哪个引脚上,同样的查看 GND 、电源部分的引脚。记下来。
观察后发现,D13 接到了 PB5 ,GND 是22号引脚。电源正极 VCC 为7号引脚,输入电压为5V,负极为8号引脚( GND 接地)。
看清楚后,我们就可以动手了。
淘宝上销售 Arduino 的两个好店铺
今天有同学问我的 Arduino 在淘宝哪家店铺买的,他找的 Arduino 怎么要65元呢。于是想把自己购买的店铺贴出来。
买 Arduino 到重庆佳明达电子:http://jmddz.taobao.com/
买元器件和传感器到深圳育松电子:http://dzyj.taobao.com/
我买了以下元器件,没有全部都用到,不过用到的器件都很好用。给大家做个参考。
在重庆佳明达电子购买的东西:
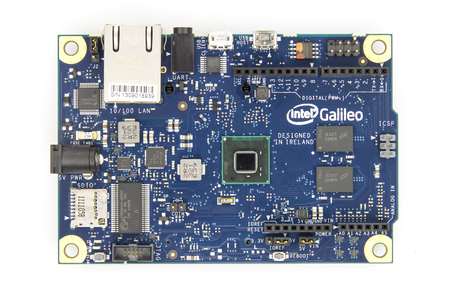
Arduino 的一个强大的新成员—— Intel Galileo
从 Intel Galileo 的名字上看就知道这个版本的 Arduino使用了Intel 的 CPU,翻译过来就是“因特尔·伽利略”。
此处转载自DIGITIMES中文网,原文网址: Intel Galileo http://www.digitimes.com.tw/tw/dt/n/shwnws.asp?CnlID=10&Cat=25&Cat1=&id=352872#ixzz2ieAIhCUi
Intel Galileo是首款采用英特尔架构的Arduino兼容开发板系列的产品,针对创作者与教育界用户打造。此平台可让入门的设计者、还有希望能将其设计推升到更高层次的使用者更进一步上手。
Intel Galileo结合了英特尔技术的效能,以及Arduino软件开发环境的简易性。此款开发板能执行开放原始码的Linux操作系统以及Arduino软件函式库,让用户能轻易扩充,并重复使用现有名为「sketch」的脚本程序代码。英特尔Galileo能在Mac OS、Windows及Linux等操作系统中编写程序。此外,这款开发板亦设计用来和Arduino机板(shield)产业体系维持硬件与软件的兼容性。
Intel Galileo采用了英特尔新发表的Quark SoC X1000,该处理器为Quark技术系列低功耗、小核心产品的首款成员。Quark SoC X1000是32位、单核心/单线程、Pentium指令集架构(ISA)兼容的处理器,运作频率最高达400MHz。
为协助将原生应用与功能扩展至Arduino机板产业体系以外的范畴,英特尔开发板还配备了多种运算产业的标准I/O接口,其中包括ACPI、PCI Express、10/100Mb以太网络、SD记忆卡、USB 2.0装置、以及EHCI/OHCI USB主控端连结埠、高速UART、RS-232串行端口、可编程8MB NOR闪存、以及用来进行除错的JTAG埠。另外,Intel Galileo提供Arduino IDE开发环境众多软件开发资源,将完整且未经修改的Linux软件堆栈的先进功能整合到单一平台,加上共享开放原始码工具链提供强大的支持。
视频介绍 Intel Galileo 的应用
它的具体参数是什么呢?
Intel的介绍:
http://www.intel.com/content/www/us/en/do-it-yourself/galileo-maker-quark-board.html
Arduino上的介绍原文如下:
查看原始链接请点击:http://arduino.cc/en/ArduinoCertified/IntelGalileo
Intel Galileo
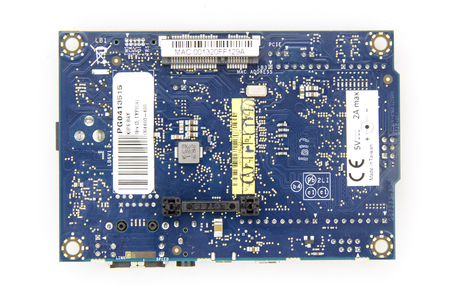
Intel Galileo Front Intel Galileo Back Overview
Galileo is a microcontroller board based on the Intel® Quark SoC X1000 Application Processor, a 32-bit Intel Pentium-class system on a chip (datasheet?). It’s the first board based on Intel® architecture designed to be hardware and software pin-compatible with Arduino shields designed for the Uno R3. Digital pins 0 to 13 (and the adjacent AREF and GND pins), Analog inputs 0 to 5, the power header, ICSP header, and the UART port pins (0 and 1), are all in the same locations as on the Arduino Uno R3. This is also known as the Arduino 1.0 pinout.
Galileo is designed to support shields that operate at either 3.3V or 5V. The core operating voltage of Galileo is 3.3V. However, a jumper on the board enables voltage translation to 5V at the I/O pins. This provides support for 5V Uno shields and is the default behavior. By switching the jumper position, the voltage translation can be disabled to provide 3.3V operation at the I/O pins.
Of course, the Galileo board is also software compatible with the Arduino Software Development Environment (IDE), which makes usability and introduction a snap. In addition to Arduino hardware and software compatibility, the Galileo board has several PC industry standard I/O ports and features to expand native usage and capabilities beyond the Arduino shield ecosystem. A full sized mini-PCI Express slot, 100Mb Ethernet port, Micro-SD slot, RS-232 serial port, USB Host port, USB Client port, and 8MByte NOR flash come standard on the board.
Visit the FAQ page for further informations.
学习Arduino:红外遥控器实验
实验所需元件
- Arduino UNO
- 红外接收管 1个
- mini遥控器 1个
- LED 1枚
- 220欧电阻 1个
- 接线
- 面包板
元件介绍
红外接收管
使用的红外接收管型号为LF1838B。它有3个引脚,分别为 out(信号输出)、GND(地)、Vcc(电源正极)。
实物图如下:

mini遥控器
又叫mp3遥控器,淘宝上很容易找到,总共3×7个按键。实物图如下:

遥控原理
遥控器按下后会发出对应按键波长下的红外线,红外接收管接收到红外线信号交给Arduino,Arduino调用红外信号库(IRremote)中的对应函数对所获的信号进行解码,解码后再交给程序执行部分进行相应的操作。
Arduino IDE中默认没有这个库,需要自己手动添加到Arduino的Libraries中。
解码准备
该迷你遥控器的对应按键解码后是多少呢?不同遥控器是不一样的,不能一概而论。具体我们可以用下面这个程序逐一试验一下,然后记录下每个按键的对应值,方便我们以后使用。
程序如下:


