ExpressLRS is an affordable open source RC system that offers ultra low latency and long range. In this tutorial I will show you how to setup ExpressLRS 2.4GHz transmitter module and receiver on OpenTX/EdgeTX radio and Betaflight, and how to flash/update the latest ELRS firmware.
New to ExpressLRS? This article explains the advantages of ExpressLRS over other radio control systems and why I prefer to use 2.4GHz than 900MHz.
ExpressLRS 2.4GHz Hardware Selection
All transmitters and receivers with ExpressLRS firmware are compatible regardless the brand.
Radios with Built-in ELRS
Getting a radio with an internal ELRS module means you don’t need to spend extra for an external module.
| TX16S MKII | Zorro | TX12 MKII |
 |
 |
 |
| Banggood GetFPV RDQ |
Banggood GetFPV Radiomaster |
Banggood AliExpress Radiomaster |
| Lite Radio 3 | T-Pro | T-Lite V2 |
 |
 |
 |
| Banggood BetaFPV RDQ |
Banggood Amazon RDQ |
Banggood AliExpress |
Transmitter Module
There are so many options when it comes to transmitter module, it might seem difficult to choose. But really, they are all based on the same open source design by the ExpressLRS, the main difference is the build quality and certain features like screen, maximum output power and cooling. As long as you are getting one from a well established brand you should be fine.
| Full Size Module (JR) | ||
| Happymodel ESTX24 Pro TX | BetaFPV ELRS Micro TX | Radiomaster Ranger |
 |
 |
 |
| Banggood GetFPV RDQ |
BetaFPV Banggood |
Radiomaster GetFPV AliExpress |
Other full size module options:
- Radiomaster Ranger Micro: https://oscarliang.com/product-y4th
- AxisFlying Thor: https://oscarliang.com/product-j7yn
- HGLRC Hermes: https://oscarliang.com/product-jssq
- HiYOUNGER ELRS 2.4GHz: https://oscarliang.com/product-58mr
- Namimno Flash: https://oscarliang.com/product-ie8s
- Happymodel ES24TX: https://oscarliang.com/product-a3r9
| Lite Module |
||
| Happymodel ESTX24-Lite TX | Radiomaster Ranger Nano | Jumper AION |
 |
 |
 |
| RDQ Banggood AliExpress |
RDQ Radiomaster AliExpress |
RDQ |
Other lite module options:
- BetaFPV ELRS Nano TX: https://oscarliang.com/product-c635
- FrSky VANTAC: https://oscarliang.com/product-50wh
- Happymodel ES24TX Slim Pro: https://oscarliang.com/product-xi1z
The TX module plugs into the external JR module bay, and it’s compatible with radios such as Radiomaster TX16S, Jumper T16, and Frsky X9D+. For smaller radios such as the Jumper T-Lite and TBS Tango 2, you will need the “Lite style” module as the module bay is smaller.
TX Antenna Upgrades
Stock antenna works fine, but if you are trying to push range you can try these higher gain antennas:
| HappyModel Moxon (4.2dB) | Namimno Black Pearl Loop (2.8dB) | BetaFPV Moxon (5.6dB) |
 |
 |
 |
| Banggood GetFPV RDQ |
Banggood | BetaFPV |
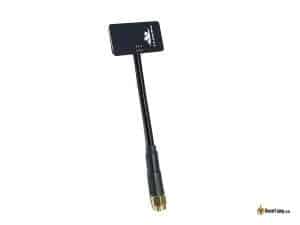
| VAS Diamond (2.8dB) | TrueRC True-MOX (2.1dB) | Turbowing Fishbone (7.5dB) |
 |
 |
 |
| GetFPV RDQ |
GetFPV RDQ |
Banggood |
Receivers
| Radiomaster RP1 | Radiomaster RP2 | x |
 |
 |
x |
| Radiomaster Banggood |
Radiomaster Banggood |
x |
| BetaFPV Nano RX | BetaFPV Lite RX | Flywoo EL24E/P RX |
 |
 |
 |
| BetaFPV Banggood |
Banggood BetaFPV |
RDQ Banggood |
| Happymodel EP1 | Happymodel EP2 | Happymodel PP |
 |
 |
 |
| RDQ Banggood AliExpress |
Banggood AliExpress RDQ |
GetFPV AliExpress |
| BetaFPV SuperD | Radiomaster RP3 | x |
 |
 |
x |
| BetaFPV AliExpress . |
Radiomaster AliExpress RDQ |
. . . |
| Skystars ELRS Diversity | MATEKSYS ELRS R24 D Diversity | HM EP1 Dual |
 |
 |
x |
| AliExpress | Banggood GetFPV |
AliExpress RDQ |
PWM Receivers
| Radiomaster ER5A/ER5C | Matek R24-P | BetaFPV PWM Micro |
 |
x | x |
| Radiomaster (ER5C) Radiomaster (ER5A) |
RDQ | BetaFPV |
Other receiver options:
- HGLRC Hermes: https://oscarliang.com/product-vsrn
- JHEMCU RX24T (has PA/LNA amplifier capable of transmitting telemetry data with 100mW, good for long range): https://oscarliang.com/product-x2xp
- JHEMCU SP24S (almost identical to EP1): https://oscarliang.com/product-srb0
- AxisFlying ELRS Receiver: https://oscarliang.com/product-jaxm
RX Antenna Replacement
- BetaFPV Dipole T Antenna: https://oscarliang.com/product-o5vm
- Radiomaster T Antenna: https://oscarliang.com/product-r4t0
All the ExpressLRS receivers and transmitter modules are cross-compatible, so it doesn’t matter which brand you get your hardware from they will work together. They are all based on the same ELRS open source design, the main differences between these receivers are:
- Build quality
- Size
- WiFi Support (for firmware update and configuration)
- Antenna (some have built-in low profile ceramic antenna, while some comes with U.FL connector for longer external antenna)
Size comparison to TBS Crossfire Nano and Frsky R-XSR:
Should I Update ExpressLRS Firmware?
You don’t have to but you should.
ExpressLRS is a fast evolving project, every firmware update includes many bug fixes and improvements. Keeping up with the latest version will protect you from potential issues and give you the best possible performance.
ELRS firmware version number is in this format: A.B.C
- A: major version number
- B: minor version number
- C: patch number
All releases with the same major version number are cross-compatible, e.g. 2.0 will work with 2.1, 2.2, 2.5 etc. But V2.x firmware won’t bind with V3.x. Major version number will only get incremented when there is a breaking change. You should update if you want to make use of a new feature, target, or bug fix. If a new version contains a critical bugfix that will be communicated in the release, in which case you should update regardless.
Flash EdgeTX or OpenTX
I recommend flashing your radio with EdgeTX rather than OpenTX. These are the operating systems of the radio.

EdgeTX is a fork of OpenTX, it’s “kind of experimental” but is more cutting edge and has many more new features than OpenTX. It’s being updated more frequently than OpenTX, and it also has specific benefits when being used with ExpressLRS such as 500Hz gimbal polling. Check out this post for how to flash EdgeTX.
If you insist on using OpenTX, that’s totally fine. Check if your current OpenTX version is older than 2.3.12, then you will need t update it in order to flash ELRS firmware to the transmitter module from the radio, and get CRSFShot working. Here is a step by step guide on how to flash OpenTX.
Download ExpressLRS Configurator
ExpressLRS Configurator allows you to build, compile and flash firmware for the receivers and transmitter module.
Download: https://github.com/ExpressLRS/ExpressLRS-Configurator/releases
For Windows, click the link with this name: ExpressLRS-Configurator-Setup-X.X.X.exe
Once you installed ExpressLRS Configurator, you will get prompted to update whenever there’s a new version, and it downloads and installs it for you automatically which is handy.
Your computer must be connected to the internet while using the Configurator.
Install LUA Script
A LUA script is a mini program on the radio. The ExpressLRS LUA script allows you to change radio link settings, enter binding mode, enable WiFi etc.
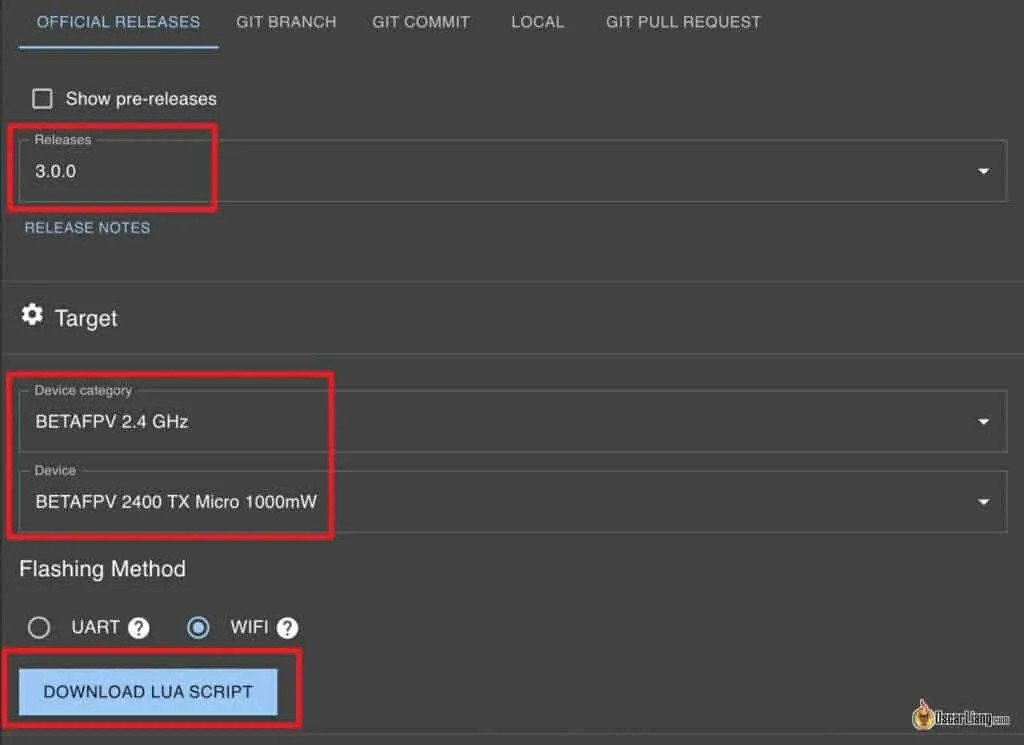
You can download it in the Configurator by selecting a release version and target, and the “Download LUA Script” button will appear.
The downloaded file should have “.lua” file extension, put that file in this directory on your radio’s SD card: \SCRIPTS\TOOLS\
Identify Hardware and Firmware Version
There are many manufacturers making receivers and transmitter modules for ExpressLRS. You need to know the brand and model of the hardware in order to flash firmware. Flashing the wrong firmware might brick the device.
The easiest way is to check on the WiFi webpage.
To enable WiFi, simply, go to the ExpressLRS LUA script => WiFi Connectivity
Then enable WiFi on the desired device.
Alternatively for receivers, you can also just wait 60 seconds without turning on your transmitter, it will go into WiFi mode automatically.
On your laptop, you should see a WiFi network called ExpressLRS TX/RX, connect to it, the password is expresslrs. After connecting, go to your browser and type 10.0.0.1 in the address bar, it will open up a website which will tell you which firmware target it’s using.
However, if you previously setup the device to join your home WiFi network, then you won’t see this WiFi network. Instead, you should simply enter http://elrs_rx.local/ or http://elrs_tx.local/ in the address bar while connected to your home WiFi.
You can check the hardware and firmware version there.
For ELRS transmitter modules, you can also find its maker, model and firmware version inside the LUA script (at the top and bottom of the page). For receivers, go to “Other Devices” in the LUA script, and click on the receiver, firmware version should be displayed there (only works since V3).
Compile and Flash TX Firmware
You can flash the TX module using one of these methods:
- UART/USB
- WiFi
I found WiFi to be the easier and more reliable method, I will demonstrate how to do it here.
Building ELRS TX Firmware
Use the ExpressLRS Configurator to build the firmware for your TX module.
Under Releases, choose the latest firmware.
Under Device Target, select the brand, and device. In this example, I have the BetaFPV Micro 1W TX, so the Target Device selections would be:
- Device Category: BetaFPV 2.4 GHz
- Device: BetaFPV 2400 TX Micro 1000mW
Let me explain what some of the settings mean.
Regulatory Domains – depending on where you are, the second option “EU_CE” is for people in the EU, anywhere else please select the first option “ISM”.
Binding Phrase – it’s like the key to your car, be creative and make a unique phrase, so people you fly with don’t accidentally use the same phrase and cause problems. Note that other people CAN control your drone if they use the same binding phrase.
Network => Auto WiFi On Interval: how many seconds it turns on WiFi mode if no radio link is established. Default is 60 but I personally prefer to set it to 20. If the receiver goes into WiFi mode you just need to unplug LiPo and plug in again.
Network => HOME_WIFI: See here for more detail.
The Configurator remembers your options, so you don’t need to select them again the next time.
Flash TX Firmware via WiFI
In the ExpressLRS Configurator, under Flashing method, select WiFi.
When you are ready, click the BUILD button (NOT Build and Flash). It can take around 5 mins to build your firmware depending on your internet speed.
A windows should pop up containing two firmware files, one named “firmware.bin” and the other named after the module type you selected. The two files are identical (just different names), so you can use either one to flash your TX module.
Plug in the TX module to your radio module bay and power on radio.
On your radio, setup a new model profile, in Model Setup, enable External RF and select CRSF in Mode.
Go to System settings => Tools, and select ExpressLRS
Select “WiFi Connectivity“.
Select “Enable WiFi” and leave the radio powered on.
Go to your computer’s WiFi, you should find a new network called “ExpressLRS TX Module“. The WiFi password is: expresslrs
Open browser and go to 10.0.0.1
Click “Choose File” and select “firmware.bin” generated from the ExpressLRS Configurator earlier.
Click Update. That’s it!
Flash TX Firmware via UART/USB
My favourite way to flash is using WiFi, but if your computer doesn’t have WiFi, you can use the USB port on the TX module to flash.
Plug in the USB cable to the TX module, a new COM port should appear on your computer.
In the ExpressLRS Configurator, under Flashing method, select UART. When you are ready, click the BUILD and FLASH button (not Build). The flashing will take a few minutes.
Most modules such as the BetaFPV TX module are plug and play when flashing via USB. However some earlier modules like the Happymodel requires an extra step for UART flashing to work. On the TX module board, there are 6 jumpers, by the default the middle two are bridged. When flashing via USB/UART, you should move the jumpers down to the bottom two pins.
Also make sure to install the cp210x drivers if you haven’t already.
Flashing SPI ExpressLRS Receiver
Some whoop flight controllers have ELRS receiver integrated on the same board, and it normally uses SPI connection instead of UART connection. A good example would be the Happymodel X12 AIO 5in1 FC in the Mobula7 ELRS Edition.
The good thing is that you don’t need to worry about wiring as it’s just part of the flight controller.
But flashing the receiver is a bit different. In order to update the RX firmware, you have to flash the latest Betaflight firmware, because ExpressLRS firmware is embedded in the Betaflight firmware for that FC. All the build options (such as domain, switch mode etc) are in Betaflight CLI (type “get expresslrs”).
To check if you have a SPI ELRS receiver, simply go to Betaflight Configurator, receiver tab, and see if it’s set to SPI RX / ExpressLRS. If it’s not a SPI receiver, then it needs to be setup via a UART, just keep reading.
Connect ELRS Receiver to FC
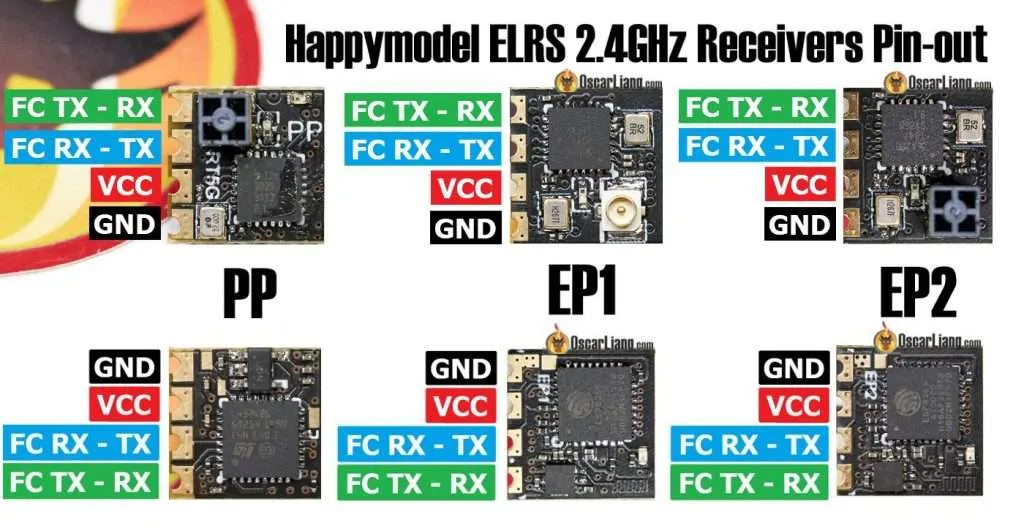
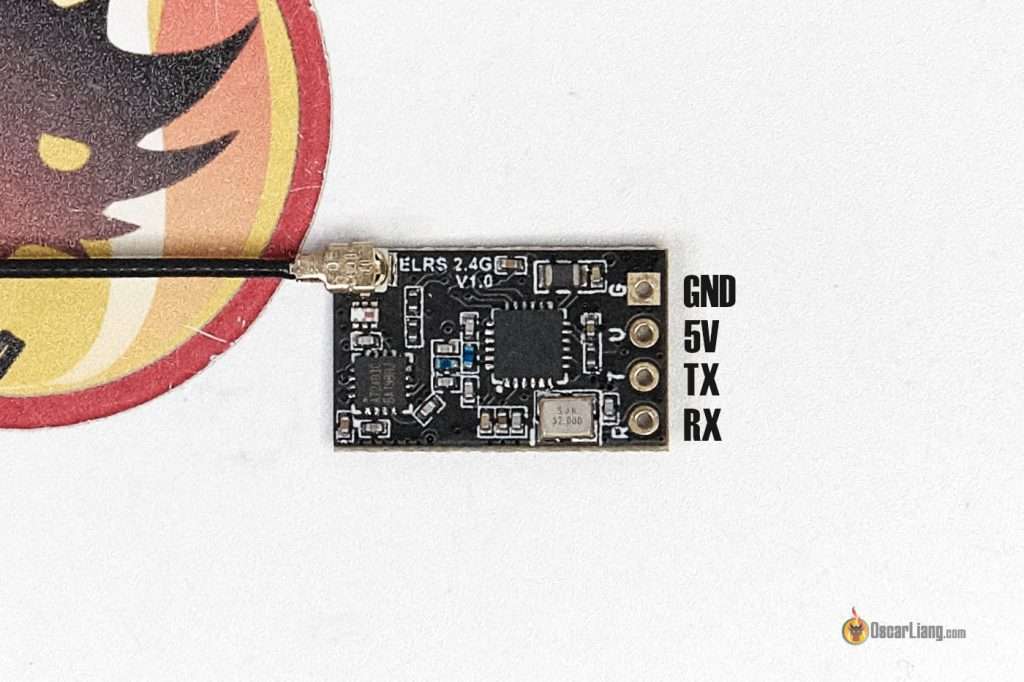
Here’s the pin-out of the PP, EP1 and EP2 receivers.
Connect TX and RX pins to any spare UART on your flight controller. DO NOT use soft-serial because it’s too slow.
Connect TX to RX, and RX to TX.
Build and Flash RX Firmware
For receivers with WiFi built-in, you can flash firmware via WiFi, just like flashing the TX. But personally I found using Betaflight Passthrough easier for flashing RX, and I will demonstrate it here.
Open ExpressLRS Configurator, select the same firmware version as your TX module and choose the device target based on the brand and receiver type. For example:
- For PP receiver, the Device is: HappyModel PP 2400 RX
- For EP1 and EP2 receivers, the Device is: HappyModel EP 2400 RX
Make sure to set the binding phrase as your TX, your RX will just bind with the TX automatically after flashing firmware. If you don’t set a binding phrase, you can bind it manually as described here.
Flash RX Firmware via Betaflight Passthrough
Before proceeding, make sure to configure Betaflight first as described in this section.
Now connect the USB cable to your quad to power the FC and RX.
In ExpressLRS Configurator, choose the COM port of the FC (if not sure, check the COM port in Betaflight Configurator, but remember to disconnect/close it afterwards).
Hit BUILD & FLASH. It will take a few minutes.
Flash RX Firmware via WiFi
Basically the steps are the same as flashing the TX module via WiFi. Some receivers don’t have WiFi capability, so make sure you check before proceeding.
In the ExpressLRS Configurator, hit the BUILD button to compile the firmware.bin file.
By default, if you power the receiver without turning on the radio, after 60 seconds it will enter WiFi mode (LED will be flashing rapidly to indicate that). The RX’s WiFi signal is fairly weak so place the RX close to the WiFi antenna to your computer.
Connect to the WiFi network “ExpressLRS RX“. The WiFi password is: expresslrs
Go to 10.0.0.1 in your browser, and upload the firmware file.
Flash RX Firmware via UART
In the rare event, if neither of the above methods work, you can try UART flashing as described here.
Flashing RX via FDTI
If for whatever reason you bricked your RX, which could happen if you lost power or connection during flashing, you can bring it back by flashing via FDTI: https://www.expresslrs.org/2.0/quick-start/receivers/hmep2400/#flashing-via-ftdi.
Binding Receiver
If you’ve set the Binding Phrase when flashing both TX and RX, you shouldn’t have to do anything, because they just automatically bind. When binding is successful, the status LED on the RX should stay solid.
If you didn’t set a Binding Phrase, you can manually bind your RX to the TX following these steps:
Bind procedure:
- Power on receiver, wait until the LED on the RX is off, immediately turn off the power, and then repeat again the above steps. When the RX is powered on for the third time, the LED will start to double-flash, indicating the RX is in binding mode
- Plug in the ELRS TX module to your radio, and enable External RF and select CRSF protocol in Mode. Execute the ELRS lua script in System Settings, Tools. Select [Bind], the LED on the RX module will become solid if bind successfully
Receiver status LED meanings:
- Solid LED means bind successfully or connection established
- Double-flash means it’s in bind mode
- Flash slowly means waiting for TX module connection
- Flash fast means it’s in WIFI hotspot mode, you can connect to the RX’s WiFi network to upgrade RX firmware by visiting 10.0.0.1 in your browser (password: expresslrs)
If the receiver doesn’t enter bind mode, chances are you flashed the receiver WITH a binding phrase. Try to flash RX firmware again with binding phrase disabled.
When the receiver and transmitter are bound, you should see a “C” in the top right corner in the LUA script when you power them on. However when they are powered off or not bound, you will get a “–“.
Betaflight Setup for ExpressLRS Receiver
To setup ExpressLRS RX’s:
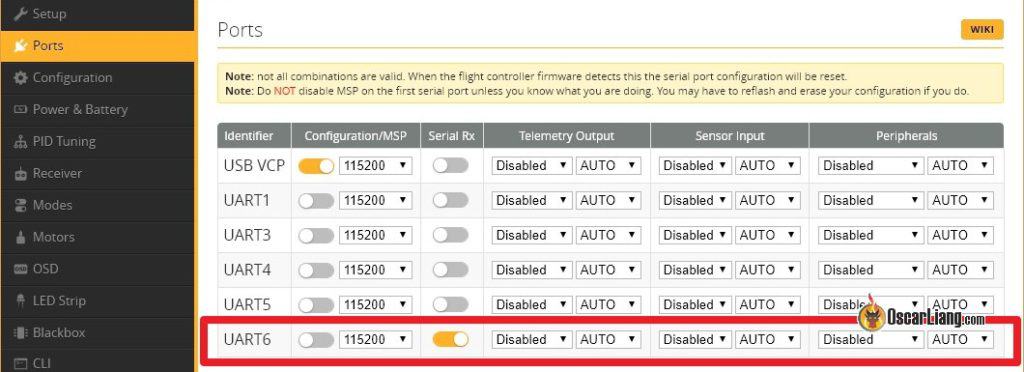
Go to the “Ports” tab in the Betaflight configurator, and enable “Serial RX” for the UART you’ve connected the ELRS receiver to. Press “Save”.
In the Receiver tab, under the “Receiver” Section, select “Serial (via UART)“ as the Receiver Mode, and select “CRSF” in Serial Receiver Provider. Enable “Telemetry”, and click the “Save” button.
Your RX should be working now.
To verify, go back to the “Receiver” tab, you should see response from stick movement. If the channels are in the wrong order, just try a different “Channel Map”.
Check if the end points (1000 or lightly lower / 2000 or lightly higher) and mid points (1500) are correct, see this guide on how to adjust if they aren’t correct.
To make sure Telemetry is working, go to the Telemetry page in the radio, and select the option “Delete all sensors“, then “Discover new sensors”.
Asterisk flashing means telemetry is updating.
In the Modes tab, you MUST set AUX 1 as your arm switch (AUX1 is always a 2-position switch, designed specifically for arming in ExpressLRS).
Display LQ and RSSI in OSD
Further Reading: What are LQ and RSSI?
In a nutshell:
- RSSI – Signal strength, how loud the signal is (value from -130dBm to 0dBm)
- LQ – Link Quality, how well your receiver can understand the signal (value from 100% to 0%)
Both indicators are useful, but if you have to pick one, LQ is probably more important.
To display LQ properly you should use Betaflight 4.2 or newer, where they introduced a new RFMD:LQ% format for the LQ OSD element.
- Receiver tab, Disable RSSI_ADC, set RSSI Channel to Disable
- OSD tab, enable Link Quality and RSSI in dBm
It’s useful to have both measurements. For example:
- low LQ, high RSSI = lots of interference around you
- high LQ, low RSSI = you are very far away and should be cautious, or if you are close that’s an indicator that maybe something is wrong with your antennas
- low LQ, low RSSI = reaching the range limit of your gear
Mounting Your Antenna
My recommendation is to mount your RX antenna vertically if possible. You can also mount it horizontally if you only fly short range. See this post for more detail.
Setup Failsafe
Digital protocols typically have a failsafe flag in the data packet, so you don’t really need to do anything on the radio side. Some would suggest setting “no pulse” in the radio, but it might not actually do anything (though it won’t hurt to set it). You do need to review the Failsafe tab in Betaflight and decide what the drone should do in the event of a failsafe.
Make sure to do a props-off failsafe test just to verify that failsafe is actually working as intended (remove all propellers, arm the quad and turn off radio, be ready to unplug if anything goes wrong).
ELRS LUA Script Settings
There are 3 main settings you should know in ExpressLRS Lua script: Packet Rate), Telem Ratio (telemetry ratio) and TX Power.
TX Power
Almost all modules support 250mW, some even up to 1W. Tests showed that 100mW can do 33km range with stock 2.4GHz gear. And it would most likely outperform your 5.8GHz video link anyway. Higher power will also consume more current, and reduce your radio battery life significantly. Higher than 500mW usually requires an external battery plugged into the module. A fan/additional cooling is recommended for higher than 250mW.
By enabling the option Dynamic Power, allows the system to automatically adjust output power depending on LQ and RSSI, this can potentially save battery life. However to do this you must have telemetry enabled.
Packet Rate
Packet rate is a compromise of range and latency, you just can’t have both. Higher packet rate has lower latency, but less range.
In ELRS V3, the packet rate modes available are:
- 500Hz, 250Hz, 150Hz, 50Hz – This is normal mode, same as in V2 and V1
- F1000, F500 – This is F mode, or FLRC, it offers faster modulation and lower latency, but shorter range than the normal mode. It supports 500Hz and 1000Hz. Great for racers. The F1000 mode has the lowest latency. It’s not about “feel”, I doubt most people can even tell the difference between 150Hz and 500Hz, but sending your command even just 1ms faster means you could react 1ms sooner which is crucial when reacting to critical situations like racing and might help you to avoid a crash
- D500, D250 – This is D mode, or DVDA (Deja Vu Diversity Aid), provides better link connection in complex interference environment by sending the same data packet multiple times to reduce the chance of data loss. D500 and D250 indicate that the same data packet is sent twice and four times respectively. D mode keeps your LQ high and prevent chance of jitter at the cost of slightly higher latency. Great for racing. It works at the FLRC mode (F1000) therefore range will be less than normal mode
- 333Hz Full, 100Hz Full – up to 16 full resolution (10-bit) channels in 100Hz and 333Hz packet rates
I mostly fly freestyle within 1 mile (1.6km), so I prefer to use the highest packet rate available to my TX16S, which is 500Hz. I don’t really race much, so D mode and F mode are not really for me. Note that 500Hz is not available in some radios, for example the Tango 2 only supports up to 250Hz.
Telem Ratio
What’s telemetry?
Telemetry is a feature commonly available in radio links. It allows the receiver to send data back to the radio, such as battery voltage, signal link quality, RSSI, GPS coordinates and so on.
Telemetry is enabled by default in ExpressLRS, it sends radio link related data like RSSI and LQ back to the radio. If you intent to use Telemetry to send info about your drone back to the transmitter, such as battery voltage, you have to enable “Telemetry” feature in Betaflight’s Receive tab.
Telemetry Ratio in ExpressLRS settings is how often telemetry data get sent. A larger number means slower telemetry update, e.g. 1:8 means telemetry data is sent every 8 frames, while 1:128 is every 128 frames (e.g. 1:8 is more frequent update than 1:128).
More frequent telemetry will increase latency to the control link, so you can choose to lower telemetry rate or even disable it entirely in the LUA script if you want more consistent packet rate. But I recommend having telemetry if you fly long range.
If you get “Telemetry lost” warnings while your link quality is still looking good, it could be that your telemetry rate is set too low. Try increasing Telem Ratio one step at a time until the “Telemetry Lost” warning disappears.
Switch Mode
The Switch Mode setting controls how the channels AUX1-AUX8 (channel 5 to 12) are sent to the receiver (the first 4 main channels are always 10-bit). The options are Hybrid & Wide.
With Hybrid mode, most of your channels will only be 2- or 3-position, this is done to reduce latency.
The “Wide” option makes your channels 64- or 128-position which is more than enough for most things we want to do, and that’s what I recommend to use.
Note that AUX1 (channel 5) is always 2-position, which is meant for arming. Low position (1000) for disarming and High position (2000) for arming, you should set it up like this in Betaflight or you could run into problem with ExpressLRS.
Additional Receiver Settings
There are more settings when you connect to the receiver via WiFi (on the page where you flash RX firmware).
First, power on the receiver and wait until it goes into WiFi hotspot mode. It does it automatically after being powered for 60 seconds by default (LED flashing rapidly when it’s in WiFi mode). Or you can also force the receiver to go into WiFi mode in the radio’s LUA script.
Now, connect to the WiFi network (the WiFi password is: expresslrs). In your browser, go to 10.0.0.1
On this page, scroll down and you will find the additional settings like Model Match. For PWM receivers, you will also have settings like PWM Output and Failsafe Positions for each channel, and the option to invert the channel outputs. These setting are not yet available in the LUA script.
Performance Enhancement Settings
In Betaflight, you should apply the suitable RC_Link preset for the particular packat rate you are using. Failure to do so will result in problems with feedforward.
See my Betaflight Tuning guide for more info.
Adding Home WiFi Network
It makes it much easier to flash firmware when you setup “Home WiFi Network” in ExpressLRS. When you put your ELRS transmitter module or receiver in WiFi mode, it will connect automatically to your home WiFi network, then you would be able to flash firmware on a browser from your computer. Easy!
To set it up, you first need to flash your TX module and RX with “HOME_WIFI_SSID” and “HOME_WIFI_PASSWORD”. These are your home WiFi network name and password. Even if you are already on the latest firmware, you have to re-flash to let your transmitter module and receiver know your network login for this to work.
Once that’s done, you can turn on WiFi mode. You can do this in the LUA script.
Open ExpressLRS Configurator, and it will automatically detect your ELRS device. Click on DNS (elrs_tx.local or elrs_rx.local), or the IP address (192.168.0.XXX), if it doesn’t work just try the other, one of them should work.
This will bring you to the page to upload the firmware, same as flashing using the WiFi method we covered before.

How to Use Model Match
Model Match is a number you can assign to a receiver, this allows you to use a model profile on the radio to only control a particular receiver.
If you normally use one model profile to control all of your models (because they are all using the same type of radio receiver and setup the same way) instead of having individual profile for each model, you probably don’t want to use “model match”. But model match is useful for models the requires trims, for example for planes and wings.
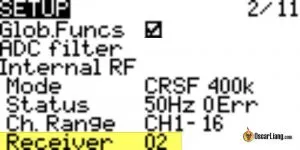
To use model match in ExpressLRS, go to Model Setup on your radio, scroll down to Internal RF (or External RF if you are using an external ELRS module). In Receiver, set it to a unique Model ID (any number between 0 and 63, in this example, I will use 2).
Put your receiver in WiFi mode, go to the webpage configuration, Model, and enable Model Match. Set Model ID to the same number you entered in Model Setup on your radio.
Go to ExpressLRS LUA script, and enable Model Match.
Now your receiver can only talk to this particular model profile with Receiver ID 2. That’s it.
SPI Receiver
If you have a SPI receiver, or a receiver that doesn’t have WiFi capability, you can set Model ID in CLI. You can’t set the ID by just rebinding while model match is on, so i had to go to betaflight CLI and enter:
|
1 |
get expresslrs_model_id |
to show me its ID and i had to:
|
1 |
set expresslrs_model_id = "your ID number" |
FAQ
“Bad Size Given” Error
V2 and V3 handles partition differently (as they moved towards unified target), so when you flash V3 firmware to your module with V2 firmware, the file size get messed up and you get “Bad Size Given” error.
The fix is to download “repartitioner.bin“, on WiFi page, upload this file instead of firmware file. It’s going to say target mismatch, select flash anyway.
Now flash the V3 firmware again, it should go through this time.
Receiver Update Warning: ”Not enough data uploaded!“
If you try to flash firmware of a different target, and force update, you will get this error “Not enough data uploaded”.
It’s a bug/feature in ELRS 2.5 that prevents target changing. If you still want to go ahead and flash a different target, you first need to revert the RX firmware back to 2.0 (on the original target), then flash the different target you wish.
LUA script only shows “Connecting…”
That’s an indication of the ExpressLRS TX module is not talking to the LUA script
Possible causes of the problem:
- TX Module is installed, or is installed incorrectly (pins in the module bay are not making proper contact or broken)
- Maybe the TX module is in WiFi update mode, restart the radio and try again
- Make sure you have set RF protocol to CRSF
- If you are running OpenTX, make sure the version is not too old (it has to be 2.3.12 or after)
How to Install Cooling Fan
There is no fan plug for the Happymodel 2.4GHZ TX module, you need to solder it directly. I found 3.3V and GND at this capacitor. Make sure you confirm voltage with a multimeter before connecting to avoid damaging the board.

Inconsistent Packet Rate – CRSFShot Not Working
In the ELRS lua script top bar, there is an indicator (e.g. 0:200) which tells you how many packets per second it’s getting from the radio. You can use it to confirm the consistency of the RC link.
Ideally it should always show a stable number that is the same as the packet rate you select. For example: 0:50, 0:150, 0:250, 0:500.
If it shows an inconsistent number like 0:63, or is stuck at 0:250 at every packet rate you select, then your radio does not have CRSFShot working properly.
The latest official release of OpenTX (2.3.12 or newer) already includes CRSFShot, so double check if your OpenTX version is outdated.
Using ExpressLRS Logo as Model Image
I made a logo you can use as model image in the TX16S/T16. You can learn how to use it here.
Image download: google drive.
Install USB to UART Driver
You might or might not need to install this driver on your PC if you want to update your TX via UART: https://www.silabs.com/developers/usb-to-uart-bridge-vcp-drivers
Taranis QX7
For Taranis QX7 users, if you are running OpenTX, you’ll need to perform this mod in order to run 400k baud rate on your radio. It’s not needed, but it is recommended if you want to get the most out of ELRS: https://www.youtube.com/watch?v=mHfQe05XJn8&ab_channel=edrone
If you run EdgeTX you won’t need to do this mod as the bug has been addressed in software.
Official Documentation
For more detailed explanation of the system, visit ExpressLRS official wiki, I barely scratched the surface here: https://github.com/
Edit History
- Jun 2021 – Updated guide: OpenTX 2.3.12 has been released, no longer need to flash nightly
- Jul 2021 – Updated: ExpressLRS 1.0 official release
- Aug 2021 – Added info for BetaFPV ELRS Nano TX and RX
- Nov 2021 – Updated product list
- Feb 2022 – Updated the complete TX, RX and antenna options currently available on the market
- May 2022 – Updated instructions for version 2.5, added info about adding home network, updated screenshot of LUA script (V2)
- Oct 2022 – Updated guide for ELRS V3 release, added PWM receiver products
- Feb 2023 – Added info about model match


